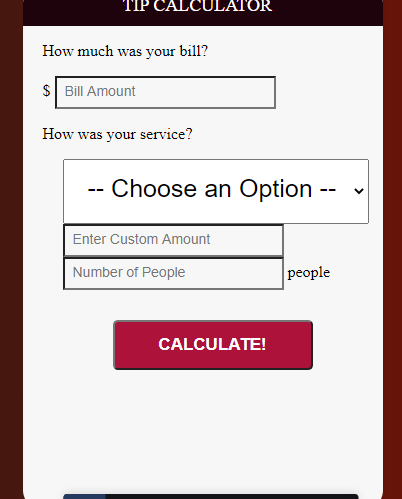
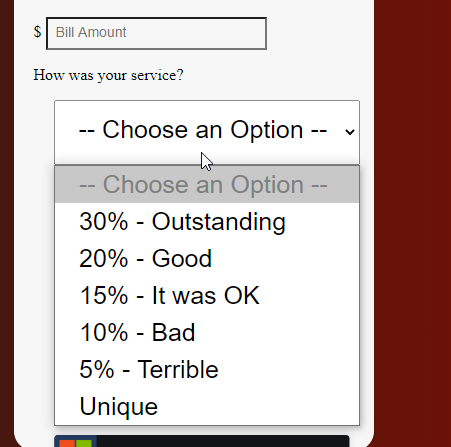
Category Archives: Computer Science

Rock Paper Scissors Part II [Alice 2]

Part II

1 Create a variable called userChoice

2. Use the world ask user for  a number function to store the user’s choice into that variable (Note: if the user chooses a number larger than 3 or less than 1 then they entered an invalid number, something to think aboutusers-turn-rps-2

3.   Set the isShowing  property of all 3 objects to be false .  We will set the visibility to true , when the user chooses that object , later on .

objectss-isShowing-to-false2

Task #1

Objective; If the user chooses rock, we  need to show a rock; if the user chooses scissors, show a scissors, and the same for paper.

Use if/else and the value of userChoice  and set the isShowing  of either the rock , the paper or the scissors to true

Remember:

1= Rock

2= Paper

3= Scissors

if-user-choice


Run through the program a few times. What should we do next ?

4.

We need to show what the CPU chooses!!

So, now we need to do a few  things:

A) edit our if/else  to consider what the user chose and  what the cpu randomly chose (both/and)

B) add a second rock, paper and scissors object that represents the CPU’s choice

(note: I set the color of the CPU’s objects to red so I can more easily distinguish the cpu’s from the user choice’s objects)

C)  Set isShowing  to false for each of the cpuChoice’s objects

rps-cpu


directions-rps


For instance, if the cpu and the user both choose rock, your screen should look something like : user-and-cpu-choose-rock

5.   State who won the round or if the round was a draw :

cpu-wins-message


7. The last line of your loop should ask the user if they want to play again.

gamePlaying at end of loop


Try playing the game a few times. You will notice that there is a problem, when you play multiple times

Can you see what is wrong with our current setup? The bug only applies to multiple games. If you play a single game and close Alice, you will not notice the problem.

rps-game-no-hidden-obj


As you can see above, when you  start  a second game, you can still see the rock and paper that were chosen in the first game.

Can you figure out how to fix  the problem?

Go here to see how to fix it and continue on with the project.


Mad Libs 1 [Python]

Taken from https://teals-introcs.gitbooks.io/2nd-semester-introduction-to-computer-science-pri/units/1_unit/06_lesson/project.html

Overview: Using Python, students will use variables, input, and printing to create a Mad Lib. You will also practice designing a project by planning out your Mad Lib before implementing it. Part of the project is to use your creativity to design your own unique story.

The program will print out the title of the Mad Libs story, as well as a short explanation of game play

The program should then prompt the user to enter in nouns, verbs, adjectives, proper nouns, and adverbs

mad_libs_screen_shot

Implementation Details

Plan out your story on pencil and paper first, before you start implementing the program.

  • Create your story
  • Select the missing words
  • Determine each words part of speech
  • Create introduction
  • Create questions
  • Divide story into print statements

As mentioned above the program must request words from the user. The following must be included in the program:

  • 10 different words inputted
  • Variable names should correspond to the part of speech requested and part of the story they belong to (e.g. noun1verb2, etc)
  • You may only use 3 print statements to tell your story

Scheme/Rubric

Functional Correctness(Behavior)
Program greets user and explains rules 3
Program accurately requests 10 words (1 for word, 1 for correct request) 20
Program prints full Mad Lib 10
Program exhibits creativity 3
Sub total 35
Technical Correctness
Program utilizes variable names to convey meaning 5
Correct order of inputted words 10
Only 3 print statements 10
Sub total 25
Total 60


Intro to CS [2018-19]

Unit 4 . Parameters and Objects [advanced] 

  • Complete Packets:
    • #18 Writing a Class Level Method
    • #20 Saving an Object to a New Class
    • #21 Stepwise Refinement (Follow the instructions carefully on this one). If your method does not seem to work, it’s probably because you switched a left leg with a right leg
    • #22 Passing Arguments
    • Assignments here 

 Unit 4 . Loops

  • Complete Packets:
    • 15 b (The Loop Instruction)
    • 16 (The While Instruction)
  • Assignments here


Unit 3 Datatypes and if/else


Unit 2

  • Complete packets #9-10  
    • #9 (variables)
    • #10 functions vs methods
    • Drag Racing
    • Spaceship Repair
    • Apollo 15
    • End of Unit Assign

Assignments and Quiz topics


Unit 1

  • Complete packets #3- 8  by Thursday Wednesday 27th
    • #1 (Example tutorial)
    • #2 (skipped)
    • #3 Coach–opacity, color
    • #4 Camera and manipulating objects (turn,tumble etc)
    • #5a Alice code (how to add instructions)
    • #5b  Alice Primitive Methods
    • #6 ( camelCase,  — read only, no tutorials)
    • #7 ( primitive methods from object tree)
    • #8 (do together )
  • Project #1
    • at least 10 instructions
    • modify a ‘subpart’
    • 1 do-together statement
    • at least 3 different objects
    • Worth 7 points.
    • To get a 7/7 you must achieve the ‘wow factor’–ie go above and beyond to create a superior final project
    • you must save your file in the format of
      • lastname-assignment1
      • morris-assignment1
  • Eventual Quiz 1 
    • binary number systems (see dropbox notes for review)
    • converting from various bases to base 10(see Google drive notes for review)
    • comment vs instruction in alice


Last year’s 


Web Design Programming 18-19

Supa Web

Phaser.io resources and links


Unit 4 Bootstrap 4

  • Class PPT’s on bs4
  • Bootstrap 4 documentation
  • Bootstrap 4 @ www
  • Download the bs4  (unzip this then copy contents of the “dist” folder to a “bs4/” folder in your project (https://getbootstrap.com/docs/4.1/getting-started/contents/#css-files)
  • cdn paths : https://www.bootstrapcdn.com

    •  
  • Colors (bg-danger, text-success etc..)

Unit 3 Jquery


Unit 2 Javascript


Unit

Mr M Assignment (reproduce the screenshots in the powerpoint)


Useful Links


Useful Websites

Alice Unit 4 [Loops] Assignments

Assignment 4.1)  

Centigrade to Fahrenheit Modification: Modify the Fahrenheit to centigrade project as follows.

  1. Use a while loop to do as many temperature conversations as  the user wantswhile-command-alice
  2. Ask the user for yes no (helphelp-icon-11-256)

mpg-loop-donahue


Assignment 4.2)loop-command-alice

 Miles Per Gallon Modification: Modify the miles per gallon project in the same way as the prior exercise.

  1. At the start, ask the user how many mpg conversions,  they want to convert.
  2. Then use a loop to do that many conversionsloop-command-alice

gabby_mpg_loop_times


4.25 ) Guess Animal’s weight assignment

Assignment 4.3) Open assignment. Your open project must have each of the following criteria

  1. a variable
  2. store the return value of a function into that variable
  3. a loop of some kind


4.4 Rock Paper Scissors 


Nested Loops Projects


Nested Loop Starter Code


Method 1) printRectangle()

Change the code from the demonstration of nested loops so that you output the following pattern below. Call this method printSqure()

screenshot.1416


Method 2 and 3)

diagAndBrders()                                                    noDiag()

diagonal_only                      diagonal


Method 4)

printMultiplicationTable()


multiplication-table-console-view

Setting up VIM

VIM is a very powerful editor.

Follow the steps below to set it up. I am using windows and you might need to slightly modify certain steps like #2 for Mac (not sure)

Part I : Install Git desktop program

1) first install git : https://git-scm.com/downloads

Part II. Install GVim

For Windows:
Download and run the executable  installer
2) Uncheck “make plugin directory” at install. (We will create our own folder called “bundle” later that serves the same purpose)

For Mac: 
(consider macvim and/or using homebrew)


setting up vim


For steps 3 and 4, you can just download this folder: bundle (unzip it and put it into your main Vim folder, as shown in picture above), or you can follow steps 3 and 4
3) create a folder called “bundle” in the core vim folder.
4) in “bundle”, you must put the vundle.vim folder (see picture at bottom). You must put Vundle.vim inside bundle.
5) Create a folder called ‘tmp’  . We will configure our vimrc  to store temporary files there (Otherwise, they get saved in CWD and youre directories end up getting littered with lots of ugly temporary vim files)
6)  Feel free to use my customized _vimrc . That file should be in your root vim folder as you can see in the screenshot at the bottom. (BTW, you must remove the “.txt” extension.)
7)Run Gvim . (If you’re using my vimrc  , you’ll get an error first time, but that’s ok). The actual gVim application is in the folder called vim80 (or whatever version of gVim you’re running. If you installed vim 7.9, then you’d look in the vim79 folder or the like)
8)Let’s install some plugins using Vundle. To do, just type: the following :PluginInstall  (Yes, do type the the colon)


To type you must press either “i” or “a” which puts you into insert mode.