VIM is a very powerful editor.
Follow the steps below to set it up. I am using windows and you might need to slightly modify certain steps like #2 for Mac (not sure)
Part I : Install Git desktop program
1) first install git : https://git-scm.com/downloads
Part II. Install GVim
For Windows:
Download and run the executable installer
2) Uncheck “make plugin directory” at install. (We will create our own folder called “bundle” later that serves the same purpose)
For Mac:
(consider macvim and/or using homebrew)
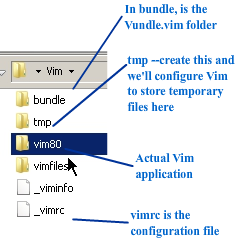
For steps 3 and 4, you can just download this folder: bundle (unzip it and put it into your main Vim folder, as shown in picture above), or you can follow steps 3 and 4
3) create a folder called “bundle” in the core vim folder.
4) in “bundle”, you must put the vundle.vim folder (see picture at bottom). You must put Vundle.vim inside bundle.
5) Create a folder called ‘tmp’ . We will configure our vimrc to store temporary files there (Otherwise, they get saved in CWD and youre directories end up getting littered with lots of ugly temporary vim files)
6) Feel free to use my customized _vimrc . That file should be in your root vim folder as you can see in the screenshot at the bottom. (BTW, you must remove the “.txt” extension.)
7)Run Gvim . (If you’re using my vimrc , you’ll get an error first time, but that’s ok). The actual gVim application is in the folder called vim80 (or whatever version of gVim you’re running. If you installed vim 7.9, then you’d look in the vim79 folder or the like)
8)Let’s install some plugins using Vundle. To do, just type: the following :PluginInstall (Yes, do type the the colon)
To type you must press either “i” or “a” which puts you into insert mode.